Buongiorno e buon inizio settimana a tutti.Quello che vi propongo oggi è un tutorial per Copic Marker Europe, il tema è : come "truccare" i
personaggi che coloriamo.
personaggi che coloriamo.
Quando io coloro i visi di personaggi adulti, mi piace colorare anche il trucco delle protagoniste del timbro, per dare più movimento alla colorazione e rendere più reale la scena.
Hello all dear friends, today I offer a tutorial for Copic Marker Europe : how to "color make up" .
When I color faces of adult characters, I like color even makeup of the protagonists of the stamp, to give more movement to the coloring and make real the scene.


Quello che vi propongo oggi è il mio modo di colorare , naturalmente ognuno può scegliere di personalizzare come meglio crede il proprio make up.
Per realizzare questo tutorial ho scelto il timbro digitale "Pansy" di Aurora Wings perchè la protagonista ha un bel viso importante in primo piano , ed è proprio perfetto per il mio post.
Questo è il timbro originale , come potete notare non ha disegnato le linee laterali del naso.
What I propose today is my way to color, of course, everyone can choose to customize as they see fit on their make up.
For this tutorial I chose the digital stamp "Pansy" Aurora Wings because the protagonist has a beautiful very important face, and it is just perfect for my post.
This is the original stamp, as you can see has not drawn the side lines of the nose.
Quindi, come primo passaggio, con il colore E 000 traccio le linee laterali del naso in questo modo:
I really like to define the nose of the character because I find that gives more balance to the face.
So, as a first step, with the color E 000 trace the side lines of the nose in this way:
Una volta che ho definito le linee del naso, sempre con il colore E 000 coloro tutto il viso in modo uniforme, tralasciando volutamente la bocca e l'arcata delle palpebre perchè verranno colorate successivamente con il make up.
Once you've defined the lines of the nose, with the color E 000 I color all over the face , deliberately ignoring the mouth and the arch of the eyelids because I came back later with make up.
Procedo ora con il colore E 00 per scurire le zone laterali del viso e l'attaccatura dei capelli
Now I go with E00 to darken the side areas of the face and the hairline
Ora è arrivato il momento del blush!
Fra questi due colori devo lavorare abbastanza velocemente per non lasciare asciugare la carta. Questo perchè, se la carta dovesse asciugare, renderebbe molto più difficile stendere e sfumare il colore sulle guance.
Quindi, ora con il colore E93 disegno il blush , partendo dagli zigomi verso il centro delle guance. proprio come uguale a quando ci trucchiamo alla mattina !
Now is time for the blush!
Between these two colors I have to work fast enough to not let dry paper. This is because, if the paper were to dry, make it much more difficult to apply and blend color on the cheeks.
So now with the blush color E93 , I start from the cheekbones toward to the center of the cheeks .
Poi nella zona alta degli zigomi,(vicino alle orecchie) aggiungo un tocco di E 95.
Then in the upper area of the cheekbones, (near the ears) add a touch of E 95.
Ora è necessario rendere la colorazione uniforme, quindi con il colore E 000 , sfumo molto delicatamente lo stacco tra il colore E 93 e le guance.
Now I need to make the uniform color, so with E 000, smooth very gently near E 93 and cheeks.
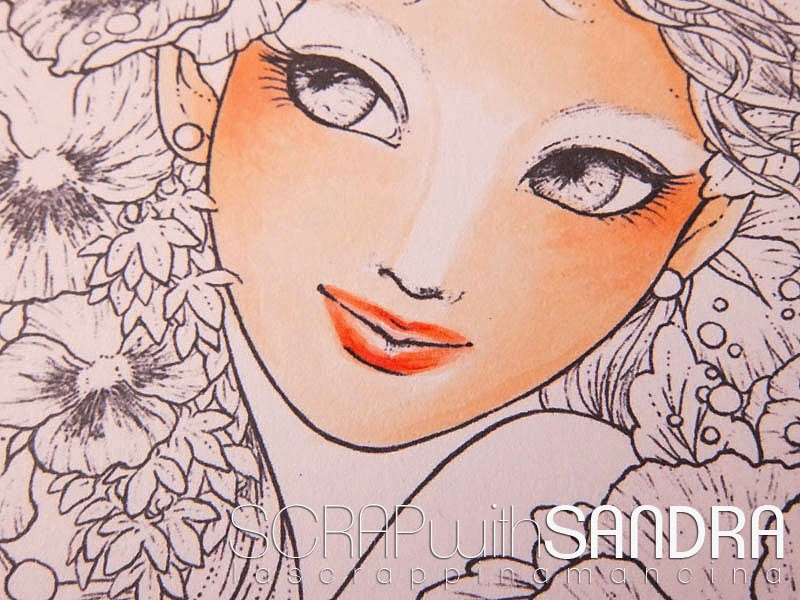
In questo caso potete notare che esistono già delle linee tracciate che disegnano il contorno delle labbra .
Queste ci possono aiutare nella colorazione.
Utilizzando il colore R11 disegno il contorno completo della bocca.
Now the coloration of the lips.
In this case you can see that there are already drawn lines outline the lips.
These can help us in coloration.
Using the color R11 design the complete contour of the mouth.
Il secondo colore che utilizzo è R20, che sovrappongo quasi completamente al precedente.
The second color that use is R20, almost over to the previous.
Ora coloro il rossetto vero e proprio con il colore R 22. Lo applico solamente nella zona centrale delle labbra.
Now the lipstick with the color R 22. I apply it only in the central area of the lips.
Poi ancora con il colore R20 per sfumare il colore R22 verso gli angoli esterni della bocca.
Then again with the R20 to fade the R22 towards the outer corners of the mouth.
Ancora un pò di R22
A bit of R 22 again
Thanks for visiting

A bit of R 22 again
E termino sfumando ancora con R20, lasciano la parte centrale delle labbra volutamente più chiara.
And at the end with R20, leaving the central part of the lips deliberately clearer.
Per colorare l'ombretto , io generalmente scelgo un colore che ho già utilizzato per colorare qualche dettaglio del personaggio.
In questo caso il timbro è pieno di Viole del pensiero che colorerò utilizzando le tonalità della famiglia BV. Quindi anche il trucco degli occhi avrà le stesse tonalità.
ATTENZIONE:
In queste foto i colori utilizzati sono un pò più forti di quelli che ho utilizzato nella colorazione finale (elenco Copic a fine post)
Questo per poter vedere più chiaramente i differenti step della colorazione.
Ho utilizzato il colore BV0000 per colorare tutta la zona sopra gli occhi.
To color eyeshadow, I generally choose a color that I used to color some details of the character.
In this case, the digi is full of pansies that I will color later using BV family. So even eye makeup will have the same shadow.
LOOK OUT:
In these photos colors used are a bit stronger than the ones I used in the final color (Copic list at the end of post).
This in order to see more clearly the different steps of the coloring.
I used the color BV0000 to color the whole area above the eyes.
Poi con il colore BV 01 traccio le zone più scure nell'angolo degli occhi e negli angoli delle palpebre.
Then with the color BV 01 trace the darker areas in the eye and in the corners of the eyelids.
Con il colore BV 000 sfumo lo stacco dei colori.
With BV 000 smooth the two colors.
Passo nuovamente il BV 01
Now BV 01 again
Poi per finire, sfumo ancora con il colore con il BV000 . Scusate non ho l'ultima foto perchè la batteria della mia macchina mi ha abbandonato proprio all'ultimo passaggio..LOL...
Then finally, blend with BV000 again.
Sorry I have not the last picture because the battery of my camera has left me at least step..LOL ...
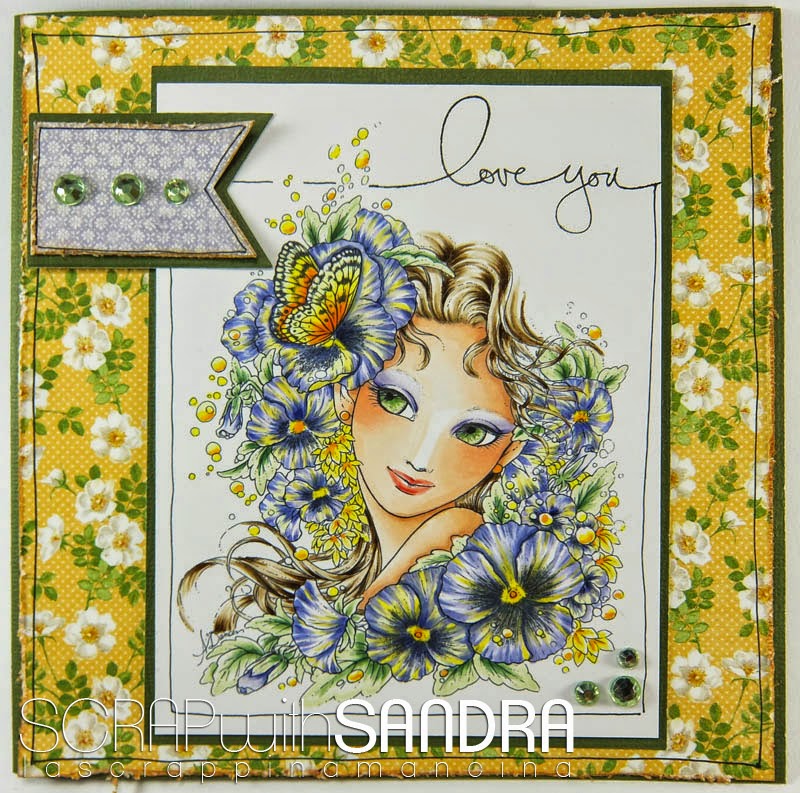
Questa è la mia card:
This is my card:
Copic utilizzati:
Skin: E000-00-01-11-93-95 R11-20-22
Eyes: G20-24
Hair: E 41-42-43-44-47
Violet: BV000-01-02-13
Yellow:Y00-02-06-18
Butterfly: Y00-06-38 YR04-09
Leaves:G20- 24-28
Con questa card partecipo al Challenge #13 di Aurora Wings - Anything goes
Grazie per la visita Copic utilizzati:
Skin: E000-00-01-11-93-95 R11-20-22
Eyes: G20-24
Hair: E 41-42-43-44-47
Violet: BV000-01-02-13
Yellow:Y00-02-06-18
Butterfly: Y00-06-38 YR04-09
Leaves:G20- 24-28
Con questa card partecipo al Challenge #13 di Aurora Wings - Anything goes
Thanks for visiting

Vi aspetto gradite ospiti sulla mia pagina FB


Wow, è assolutamente fantastico!! Sei bravissima!!
RispondiEliminaWonderful, creative coloring on the image, and a lovely card, Sandra!
RispondiEliminaMitzi xxx
Artist/Owner Aurora Wings
What a fabulous tutorial, Sandra! Beautiful coloring and your card is just wonderful! Perhaps you'd like to add it to the Anything Goes Challenge at the Aurora Wings Challenge Blog that started today. xxD
RispondiEliminaHermoso coloreado... Gracias
RispondiEliminaLe tue card diventano vere opere d'arte.
RispondiEliminawow complimenti... è stupenda.... al make up non ci avevo mai pensato!
RispondiEliminaawesome tutorial!
RispondiEliminahugs Cordine
So happy you decided to share. Thanks so much for joining our ATG Challenge at Aurora Wings. xxD
RispondiEliminaSaro' breve...bava alla bocca :-)
RispondiEliminaWow what a great tutorial and a beautiful card! thanks for joining us at Aurora Wings!
RispondiEliminaHugs
WOW che meraviglia! Grazie per aver condiviso questo utilissimo e chiarissimo tutorial!
RispondiElimina